The Markha River is a river in Ladakh, India. It is a tributary of the Zanskar River and starts at the junction of the Langtang Chu and Nimaling Chu. Villages along the river valley include Skiu (Skyu), Markha, Umlung and Hangkar (Hankar). The Markha River lies within the Hemis National Park.

The Markha Valley is one of the most popular trekking routes in Ladakh,accessible from Ganda La pass near Spituk in the west, which is usually the beginning point of the trek,and Gongmaru La pass near Hemis, where the trek usually ends. Villages on the route of Markha valley trek are Rumbak, Shingo, Skyu, Sara, Markha and Hankar.

Towards the head of the valley you can find the Kang Yatze, a 6,400-metre-high (21,000 ft) mountain. The Markha River also passes to the south of the Stok range which includes the 6,153-metre-high (20,187 ft) Stok Kangri mountain.

The Markha valley trek is one of the most popular treks in Ladakh. This trek passes through beautiful villages tucked in the deep valley surrounded by towering mountains. The high pass of Kongmaru La offers spectacular views of the

The Markha valley trek is one of the most popular treks in Ladakh. This trek passes through beautiful villages tucked in the deep valley surrounded by towering mountains. The high pass of Kongmaru La offers spectacular views of the kang yatse peak. You can stay in homestays throughout the trek and it’s an excellent opportunity to discover the everyday life of locals. Markha is part of the Hemis National Park, home to the elusive snow leopard.

You can stay in homestays throughout the trek and it’s an excellent opportunity to discover the everyday life of locals. Markha is part of the Hemis National Park, home to the elusive snow leopard.

Itinerary

Day 1: Chilling – Skiu

Time: 2-3 hrs
Distance: 6.9 km
Elevation gain / loss: +189m / -18m

  • cross the Zanskar river and enter the Hemis National Park
  • follow the trail to Markha valley
  • homestay can be arranged in Skiu

 Day 2: Skiu – Markha

Time: 6-7 hrs
Distance: 21.2 km
Elevation gain / loss: +451m / -57m

  • continue walking along the river, the trail to Markha passes through small villages.
  • Markha is a pretty village with just around 20 households.
  • you can visit the old monastery and the ruined fort which are above the village.
  • homestay is available in Markha.

Day 3: Markha – Hankar

Time: 4-5 hrs
Distance: 11.2 km
Elevation gain / loss: +305m / -35m

  • walk along the river
  • you can visit Techa gompa which is built on a cliff near Umlung village
  • homestay is available in Hankar

Day 4: Hankar – Nimaling

Time: 5-6 hrs
Distance: 10.7 km
Elevation gain / loss: +836m / -25m

  • the path starting from Hankar village leads you to Nimaling, where villagers bring their cattle for grazing during summer.
  • there is a possibility for enthusiastic trekkers to hike to the base of the Kang Yatse glacier in a few hours from Nimaling.

Day 5: Nimaling – Kongmaru La – Shang Sumdo

Time: 6-8 hrs
Distance: 17.0 km
Elevation gain / loss: +439m / -1601m

  •  ascend the Kongmaru La and enjoy the spectacular views of Kang Yatse and Karakoram peaks from the pass.
  • the descent is steep and long towards the Shang gorge.
  • you need to cross the river several times before you reach the village.
  • homestay can be arranged in Shang Sumdo

Day 6: Shang Sumdo – Hemis

Time: 3-4 hrs
Distance: 10.7 km
Elevation gain / loss: +281m / -283m

  •     walk to Hemis monastery, one of the well-known monasteries in Ladakh.
  •     jeep can be arranged from Shang Sumdo or Martselang to Hemis
1

Day 1-Leh – Chilling– Skiu

Altitude: 11,560 ft – 10,490 ft – 11,160 ft

Distance:  60 km drive, 7 km trek

Duration: 2 hours drive, 2-3 hours trek

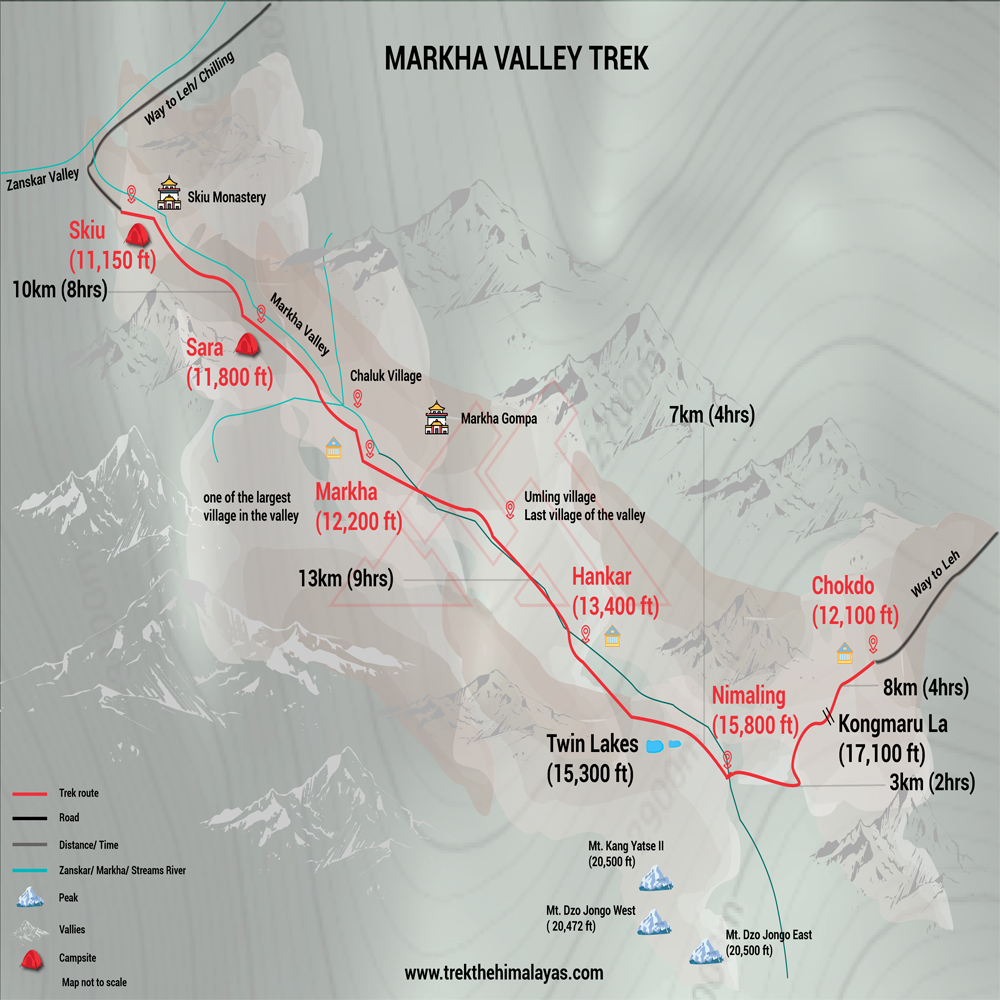
Chilling is the point where Markha river drains into the mighty Zanskar river. It is also the nearest road head for starting the trek.

If you are in a group hiring a taxi would be your best bet (Rs. 3000) since buses from Leh to Chilling run only twice a week. You can also try to get a seat on one of the vehicles heading to Chilling. Many tempo travellers take tourists to Chilling for Rafting tours, if you are lucky you should be able to buy a seat or two by getting in touch with a travel agent.

Once at Chilling, begin by crossing the Zanskar river using the trolley bridge. Crossing the mighty river sitting on the trolley is a fun way to kick things off. Recently a bridge has been constructed here so that is another option for crossing the river.

After crossing the river, take a right turn. This is actually a motorable road that continues for a few kilometers. Just as you start you will notice a path that deviates from the road and climbs up. Feel free to take this path to skip the rather monotonous walk along the road.

The initial part of the trail involves a steep climb for about half an hour and you might struggle a bit because of the altitude. But the tough part of today’s trek is over. The trail joins the road from here and flattens out.

From here it is a relatively flat walk above the Markha river all the way to Skiu. En route, you will pass the village of Kaya after another 3 km. There are homestays in this village as well so you can rest here for the night, though it will make the next day very long.

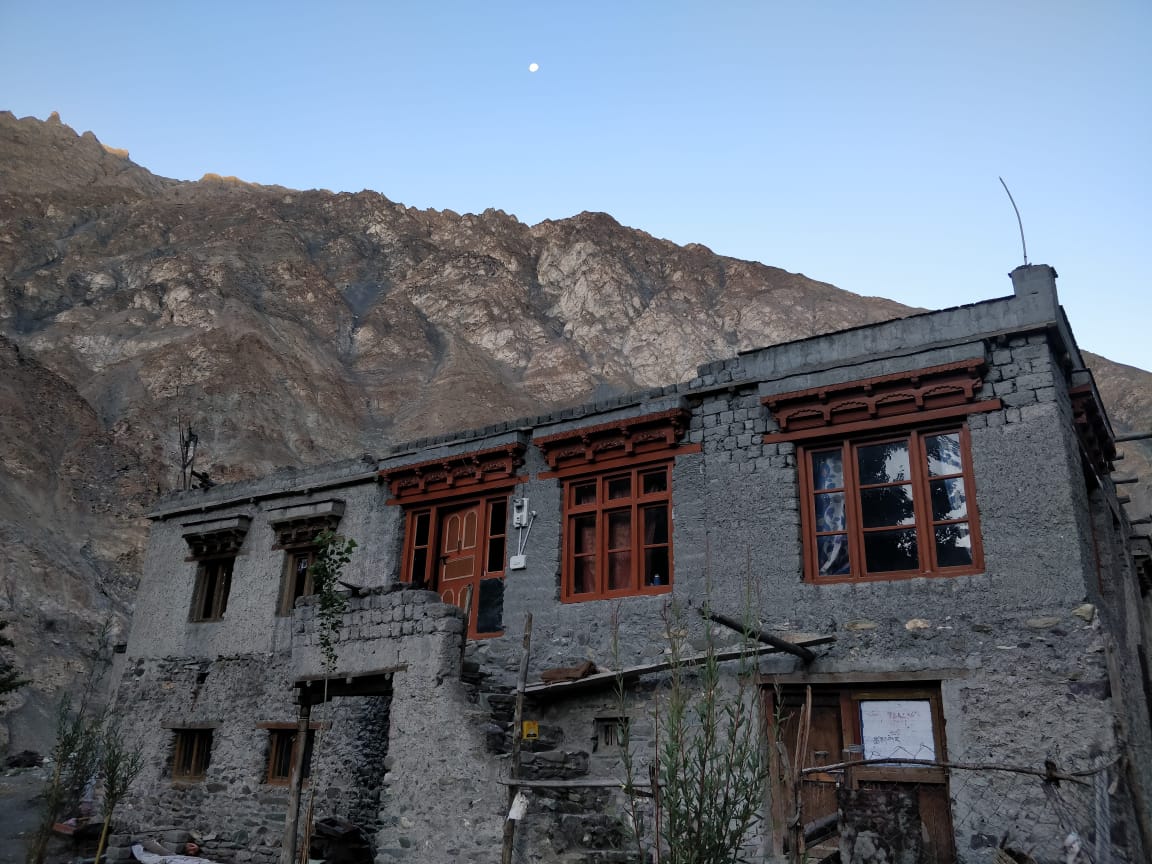
Skiu is another 3 km ahead of Kaya. It is a nice village nestled between huge rocky mountains. There are homestays here, as well as camping grounds. It is not advisable to go ahead as the next village is quite far away. Get some good rest tonight to prepare for tomorrow’s long walk.

2

Day 2-Skiu – Markha

Altitude: 11,160 ft – 12,370 ft

Distance: 20 km

Duration: 6-7 hours

Today is a long day of relatively flat trekking along the riverbed. It is also the lone day of the trek where you see some greenery, as you pass by many barley fields and thickets along the Markha river. The challenge (and fun) today will be crossing the icy waters of Markha river, not once but twice.

Start by heading eastwards up the Markha valley. The trail goes along the river for 2 km till you reach a bridge. Do not cross the bridge but stay on course along the river.

The trail from here has a few washout sections requiring you to climb up and down to pass the broken section of the trail. The trail ahead goes through a bridge crossing. 2 km further from this bridge is a clearing known as Narding. Another 3 km ahead is a campsite called Sara.

1 km ahead of Sara is another bridge which you have to cross. You have reached the village of Chalak. It is a beautiful village with Barley fields. It takes 5 to 6 hours to reach Chalak from Skiu. From Chalak, the trail ascends gradually as you pass by a trail marked by Bharal horns.

After 2-3 km, the valley opens up and a river crossing takes you to Markha Village. The water here can be thigh-high. The water is icy cold so it is better to take off your shoes and socks and pull up your pants. Look for a suitable spot for wading in, preferably where the river widens

Once you cross over, trek for a couple of kilometers till you reach the final bridge crossing for the day. As you cross over the bridge, you approach Markha- the biggest village in the valley. Markha has over 25 houses and there are many homestays here.

3

Day 3-Markha – Hankar)

Altitude: 12,370 ft – 13,100 ft

Distance: 11 km

Duration: 4-5 hours

The most beautiful part of the trek begins today. The views start to open up today as you enter upper Markha valley. You get amazing views of Kang Yatse, a near-perfect pyramid, on today’s trek.

Take the trail that climbs up from Markha village. Follow the trail from Markha village alongside Markha River. You will come across a wooden plank bridge, ignore it and continue walking with the river to your right.

After about 2 km, you have to wade through Markha River. You will need to cross over at least twice today. After the second river crossing, it is a 2 hour hike up to Umlung, a small settlement. Look out for the Umlung Gompa and cross over from its base to reach Umlung.

As you climb up from Umlung you get the first view of Mt. Kang Yatse, it is a truly breathtaking sight. Two hours of walking skirting up a gorge will take you to the picturesque village of Hankar. It is possible to go further to Thochungtse, but there are no homestays there.

4

Day 4-Hankar – Nimaling

Altitude: 13,100 ft – 15,400 ft

Distance: 10 km

Duration: 5-6 hours

Today is another short day of trekking in a spectacular setting. Take it easy and enjoy the views, but make sure to reach Nimaling early before the weather turns bad.

Continue along the trail as it climbs up steeply from Hankar. After about 1 km, the trail splits in two. Ignore the trail that climbs up, it goes to a pass called Zalung Karpo La. Continue along the lower trail, after another 1 km, you will reach the campsite of Thochuntse.

Thocuntse has lovely green fields with a couple of teahouse tents. Just after Thochungtse there is a fork in the trail. Take the trail to your left, the trail to the right goes towards Kang Yatse base camp.

The trail remains quite steep for about an hour before the ascent becomes relatively gradual. Soon you reach a beautiful pond with Kang Yatse in the backdrop. This is a perfect spot for having your packed lunch.

From the pond, it is a gradual but long descent to the wide, windy plateau of Nimaling. Nimaling is surprisingly green given its altitude and is used as a summer pasture. In the trekking season (May to September), there is a tea house here with many ready-to-use tents where you can sleep for the night.

5

Day 5-Nimaling – Kongmaru La – Chokdo

Altitude: 15,400 ft – 17,060 ft – 12,810 ft

Distance: 12 km

Duration: 5-6 hours

Today’s trek is relatively difficult. First you have to negotiate the short but steep ascent to the high Kongmaru La. But what is perhaps more difficult is the steep, almost never ending descent from the pass.

Most people descend all the way down to Shang Sumdo the same day, but that makes for a rather unpleasant last day. If time is not a constraint, it is highly recommended to stop at Chokdo for the night.

From Nimaling, Kongmaru La is very clearly visible to the east. Cross the stream near the campsite and proceed towards the pass. There is a clear trail that climbs up steeply to the pass. From Nimaling it takes around 2 hours to reach the pass.

Kongmaru La is a great spot to rest after the grueling trek up. On a clear day, you get great views of the Indus valley and Ladakh ranges from here.

This is however not the end but rather the beginning of the really difficult part of the day. The descent from the pass is brutal. The terrain is rocky and drops down steeply as you enter into a narrow canyon after trekking down 2 to 3 km.

After about 2 hours of descent, the canyon widens as your reach Sukarmo. Sukarmo has tea house tents so you can also stop here for the night if you wish to. After another hour of walking on the river bed, you come to a section running along a small hill. The trail here is descending consistently.

Soon you will reach Chokdo, a small village and your destination for the night. You can stay at one of the homestays here. Chokdo has phone facilities so if you plan on taking a taxi from Shang Sumdo to Leh, it is advisable to book one at Chokdo itself. Otherwise you might have to wait long hours for a taxi once you reach Shang Sumdo.

6

Day 6<strong>-Chokdo – Shang Sumdo – Leh</strong>

Altitude: 12,810 ft – 12,140 ft – 11,560 ft

Distance: 5 km trek, 50 km drive

Duration: 2 hours trek, 2 hours drive

Today is a very short and easy day of trekking to the road-head Shang Sumdo. It is a flat walk along the river bed and should take you less than two hours.

From Shang Sumdo there are buses to Leh, but they are not frequent. In case you don’t find a bus you can take a taxi to Leh. It is a good idea to find fellow trekkers willing to share the taxi. En route to Leh you can visit Hemis monastery.

By Air :-
The easiest way to get to Leh is to fly in, Leh is accessible by air from all major Indian airports. If you do fly in, you should rest in Leh for at least a day in order to acclimatize to the altitude (11,560 ft)

By Bus:-

The more adventurous but time-consuming way to get to Leh is by taking the road, either from Manali or from Srinagar. The Manali-Leh route is arguably more scenic than the Srinagar-Leh route, though it is also higher. Buses, as well as shared taxis, run on both Manali- Leh and Srinagar-Leh routes.

Traveling by the HRTC bus is the cheapest way to get to Leh from Manali. It takes two days and costs about Rs. 800, halting at Keylong for the night. Keylong is a nice town in itself and it would be a good idea to stay there for a day. A slightly more expensive but convenient option is the HPTDC run deluxe bus which stops at tourist locations along the way. It costs around Rs. 3000, which includes tented accommodation and food at Keylong.

There are also many privately run shared buses and taxis available, but be sure to get the details of the route. If you do opt for a shared taxi take one that stops overnight, preferably at Jispa. Avoid the taxis that run non-stop from Manali to Leh, it will be sheer torture.

Includes

  • Meals during the trek
  • Transportation from Dehradun to Lolajnag and back to Dehradun.
  • Dinner on arrival day in hotel
  • Forest Permits/Camping Charges (only if availing transportation through A1 Himalayas). Included only up to amount charged for Indian Nationals.
  • Tents, Sleeping bags, mats.
  • Safety Equipment includes static rescue rope, seat harness, carabiners, pulleys.
  • Trek guide, cook, helpers, porters & mules for carrying common luggage.
  • Services of a Certified Trek Leader.

Excludes

  • Meals during road journeys
  • Carriage of Personal Bags during the trek
  • Any kind of Insurance
  • Any expense of personal nature
  • Any expense not specified in the inclusion list.

Note :

Normally a1himalayas expect to carry your personal luggage on your own, if you wish to offload your backpack, you can give it to Mule.

Charges of offloading backpack:- Contact Us

The backpack cannot weigh more than 11 kgs. Backpack should have waterproof cover. Suitcases/strolleys/ bags will not be allowed.

Paying the Trek /Tour fee:
The fee can be paid by online transfer/Check deposit/Cash deposit/Demand draft. Instruction for payment will be forwarded along with your confirmation email. When your transfer is done, please e-mail us a confirmation mail with your transfer details, so that we can follow up your reservation efficiently.

1) Trekking Shoe/Snow Shoe

2) Rucksack/Back Pack

3) Rucksack cover (Waterproof)

4) Daypack/Knapsack

5) Undergarments/Innerwear

6)Woolen socks

7) Woolen gloves

8) Waterproof gloves

9) T-shirt

10) Trek pants

11) Camp sandal

12) Balaclava/Woolen skull
cap/Monkey Cap

13) Sun cap/Wide-brimmed
Hat/Bandana

14) Walking Sticks/Trekking
Poles/Ski Poles

15) Heavy Jacket

16) Windproof Jacket/Wind
Cheater

17)Raingear/Poncho/Waterproof clothing

18) Water bottle/Hydration pack

19) Sunscreen lotion

20) Sunglasses

21) ChapStick/Cold &
Moisturizing cream

22) Toothbrush and toothpaste

23) Towel

24) Hand sanitizer

25) Tissue roll ( Toilet)

26) Anti Fungal Powder

27) Torch/Head Lamp with extra batteries

28) Knee cap

29) Camera with extra cells

30) Dry food items

31) Personal first-aid kit

32) Medicines (This is a simple
guide line and a doctor’s
consultation is recommended.)

Altitude is a risk. Before you begin the trek, you should be aware of the effects of high altitude on your body. Acute Mountain Sickness (AMS) symptoms include a moderate headache, nausea, and overall discomfort.

Reponse: If you have any of these symptoms, notify the trek leader immediately and follow his advice. To deal with the scenario, each campsite contains a stretcher, a fully prepared first aid kit, and oxygen cylinders.

Weather Risk : No one can guarantee snow, rain, or sunlight, even if we keep a constant eye on the weather. Please keep in mind that your safety is our primary priority, and if the weather isn’t cooperating, we won’t leave the campsite.

Response: The choice to go or wait for better weather will be made solely by the Trek Leaders and Guides.

Risk: Injury is a possibility. While trekking across difficult terrains, minor injuries such as calf sprains, bruising, and other minor ailments are prevalent. Serious injuries, such as fractures or significant cuts, are quite uncommon.

Response: All of our Trek Leaders are trained in wilderness first aid. They’ve been taught to deal with emergencies and have a well-stocked first-aid equipment to deal with minor injuries. In the event of major injuries, the patient is carried to the nearest road-head on a stretcher and taken to the nearest medical facility.

DO’S AND DON’TS ON A TREK
1. Alcohols or any other intoxicating products ‘’STRICTLY PROHIBHITED’’
during the trek.
2. Always pay heed to the trek guides or instructors.
3. Try not to leave the group under any circumstances.
4. Avoid trekking during the nights as it is extremely dangerous.
5. Avoid using earphones as that might hinder your hearing.
6. Do not participate or encourage littering of the places in any form.
7. While visiting the local villages and tourist sites, obey the local guidelines
and instructions.
8. Do not harm or interrupt the local sentiments of the places.

IMPORTANT:
Your safety is of paramount concern while traveling with A1 Himalayas.
Please note that your leader has the authority to amend or cancel any part of
the itinerary if it is deemed necessary due to safety concerns. Since adventure
entails traveling in remote mountainous regions, we cannot guarantee that we
will not deviate from it. Weather conditions, health condition of a group
member, unexpected natural disasters, etc., can all contribute to changes in
the itinerary. The leader will try to ensure that the trip runs according to plan,
but please be prepared to be flexible if required.